今回は「Googleアカウント」を新たに作る手順を解説します。
Googleアカウントを複数所持したい。
YouTubeを始めたいけど、すでに持っているGoogleアカウントではなく新しいアカウントを使いたい。
といった場合のご参考になれば幸いです。
また、最後に不正アクセス対策の2段階認証も設定するので、併せてご覧いただけたらと思います。
![](https://koishiken.com/wp-content/uploads/2022/07/koishiken-150x150.jpg)
小石健と申します。YouTubeチャンネルはこちら。
YouTubeでの注意点
Googleアカウントは基本的にいくつでも作ることができますが、YouTubeを始めるにあたっては以下の注意点があります。
- Googleアカウントを複数人で共有することはできない。
- 複数人でチャンネルを管理するには「ブランドアカウント」を使う。
グループや会社などでチャンネルを運営する場合は、Googleアカウントから派生させた「ブランドアカウント」の使用をおすすめします。
ブランドアカウントの解説および作成手順については下の記事をご参照ください。
詳細は上の記事にゆずりますが、その他のメリットもあるので、個人でYouTubeを始める場合もブランドアカウントを使用した方がいいかと思います。
その際の流れは以下となります。
- Googleアカウントを作成
- Googleアカウントにてブランドアカウントを作成
- ブランドアカウントにてYouTubeチャンネルを作成
ちなみに、ブランドアカウント(YouTubeチャンネル)は、Googleアカウントひとつにつき100個まで作成することができます。
Googleアカウント作成の前提
話が少し逸れましたが、今回は以下の前提でGoogleアカウントを作成します。
- すでにGoogleアカウントを所持している
- ビジネスではなく個人用として作成する
- パソコンを使用
- ブラウザはGoogle Chrome
また、アカウントのパスワードやGmailアドレスなどの個人情報は、忘れないようどこかに保存しておくのをおすすめします。
Googleアカウント作成手順
![Googleのトップページ](https://koishiken.com/wp-content/uploads/2024/03/google-home-page.png)
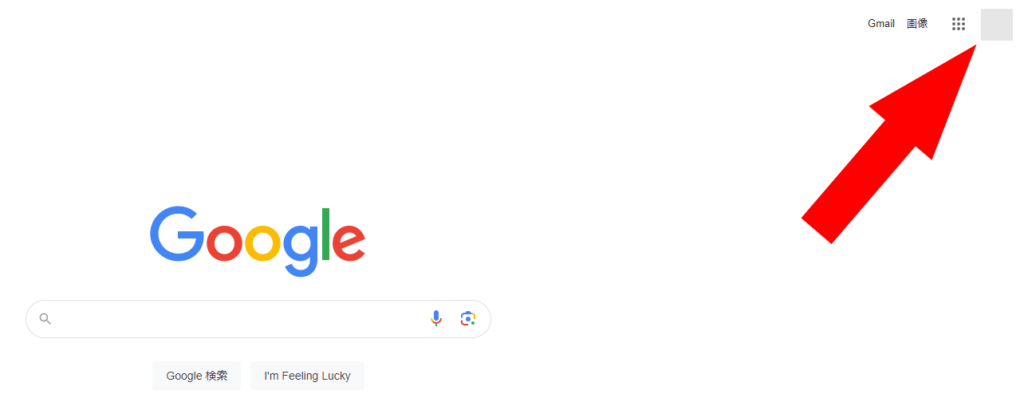
まずGoogleのトップページを開きます(https://www.google.co.jp/)。
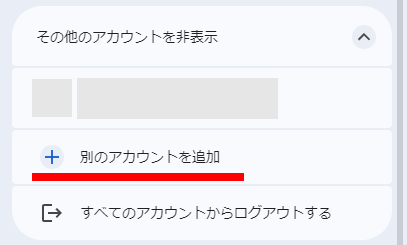
画面右上のアイコンをクリックします(下図①)。
![GoogleトップページのGoogleアカウントのアイコン](https://koishiken.com/wp-content/uploads/2024/03/google-account-icon-on-google-home-page.png)
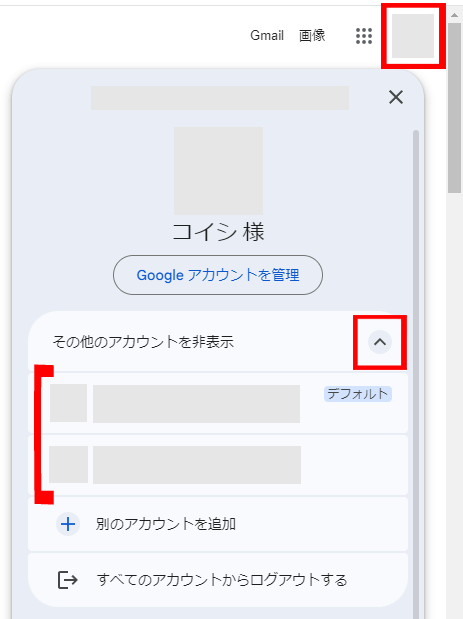
「その他のアカウントを表示」を開きます(上図②をクリック)。
この中にある「別のアカウントを追加」をクリックします。
![Googleの別のアカウントを追加するボタン](https://koishiken.com/wp-content/uploads/2024/03/button-to-add-another-google-account.png)
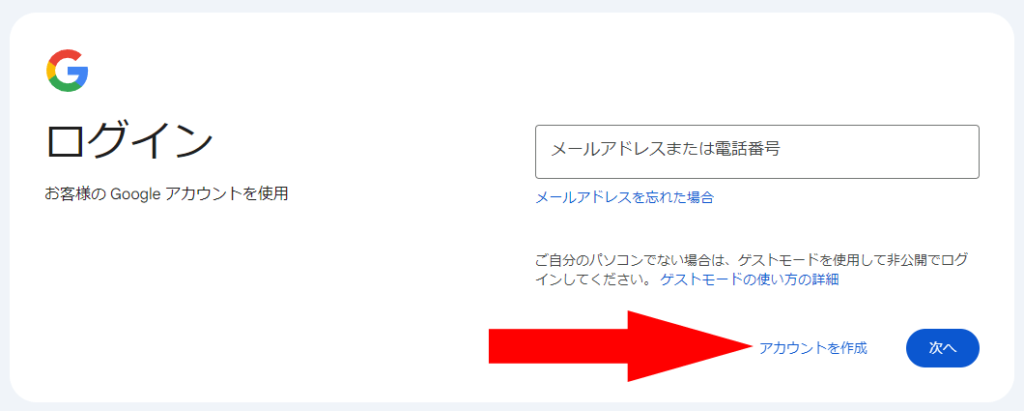
ログイン画面の「アカウントを作成」をクリックします。
![Googleアカウント作成のログイン画面](https://koishiken.com/wp-content/uploads/2024/03/login-screen-for-creating-a-google-account-1024x411.png)
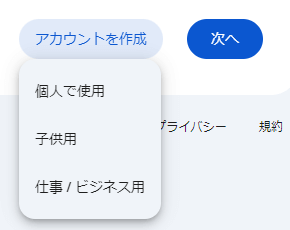
ここでは「個人で使用」をクリックします。
![Googleアカウントの用途の選択画面](https://koishiken.com/wp-content/uploads/2024/03/google-account-usage-selection-screen.png)
「Googleアカウントを作成」画面にて姓と名を入力します(姓は省略可)。
![Googleアカウントの名前の入力画面](https://koishiken.com/wp-content/uploads/2024/03/google-account-name-input-screen-1024x395.png)
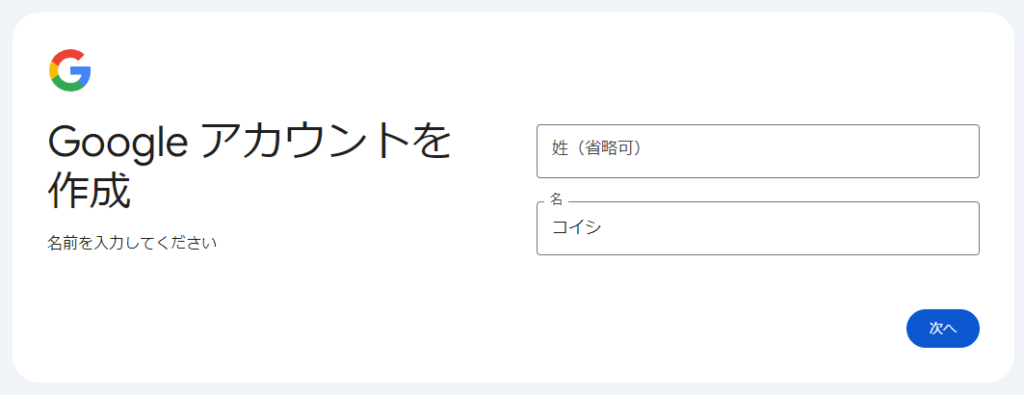
ここでは「コイシ」と名のみを入力しました。
「次へ」をクリックします。
「基本情報」画面にて生年月日と性別を入力・選択します。
![Googleアカウントの生年月日の入力画面](https://koishiken.com/wp-content/uploads/2024/03/google-account-date-of-birth-input-screen-1024x408.png)
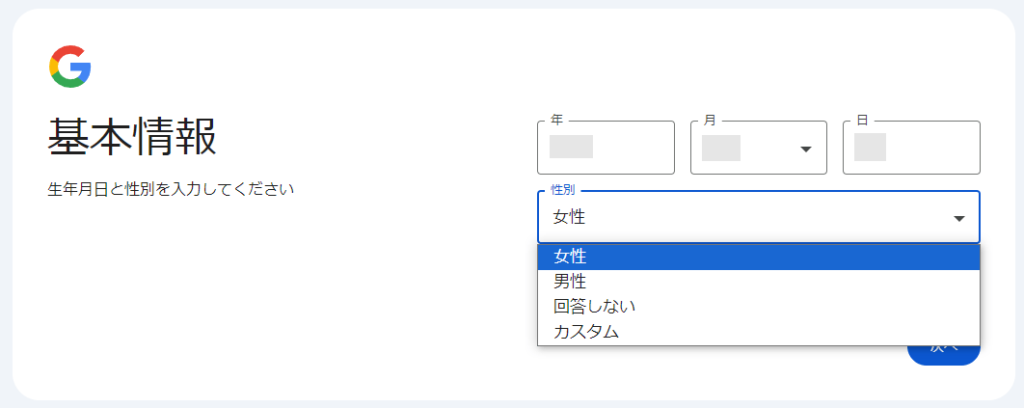
※性別の「カスタム」を選択すると、下図のように細かく入力することができます。
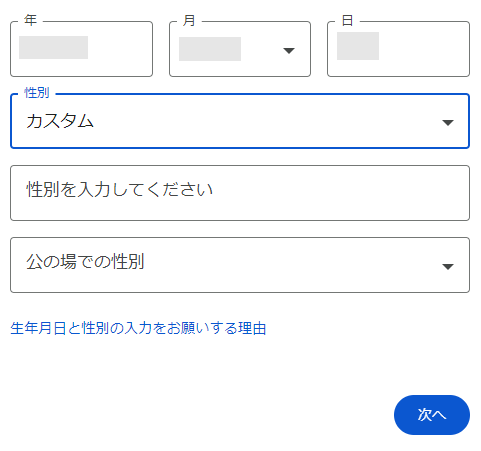
![Googleアカウントの性別のカスタム入力画面](https://koishiken.com/wp-content/uploads/2024/03/custom-input-screen-for-gender-of-google-account.png)
「次へ」をクリックします。
「Gmailアドレスの選択」画面にて、Gmailアドレスを選択もしくは入力します。
![Gmailアドレスの入力画面](https://koishiken.com/wp-content/uploads/2024/03/gmail-address-input-screen-1024x502.png)
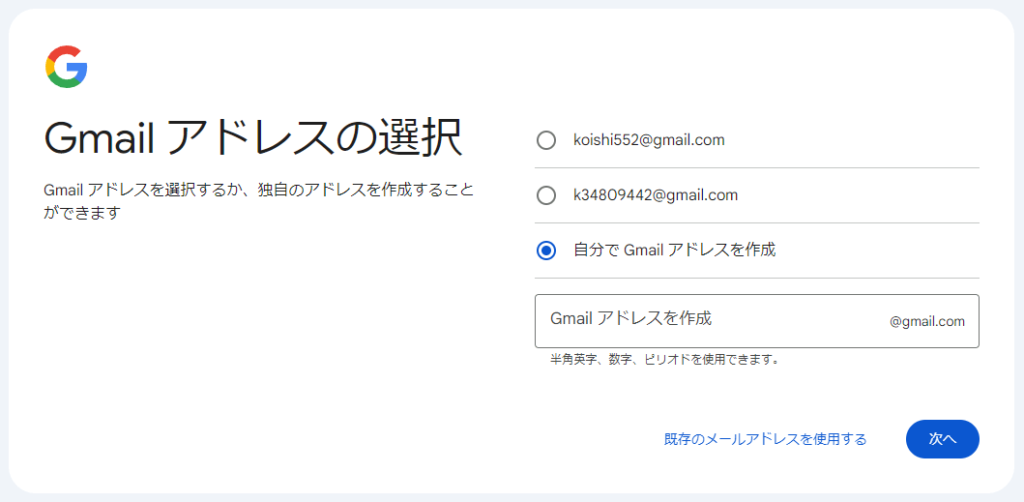
ここでは「自分でGmailアドレスを作成」にチェックを入れ、任意のアドレス(「@gmail.com」の前の部分)を入力します。
このGmailアドレスは変更できません。
「とりあえず」で不都合なものを入力しないようにします。
「次へ」をクリックします。
「安全なパスワードの作成」画面が表示されます。
![Googleアカウントのパスワードの入力画面](https://koishiken.com/wp-content/uploads/2024/03/google-account-password-input-screen-1024x422.png)
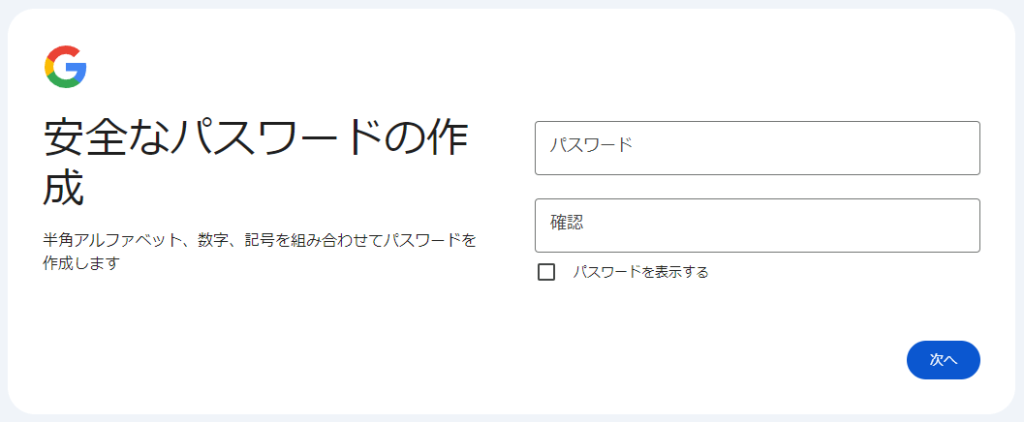
半角アルファベット・数字・記号を組み合わせたパスワードを入力して「次へ」をクリックします。
「再設定用のメールアドレスの追加」画面が表示されます。
![Googleアカウントの再設定用のメールアドレスの入力画面](https://koishiken.com/wp-content/uploads/2024/03/email-address-input-screen-for-resetting-google-account-1024x441.png)
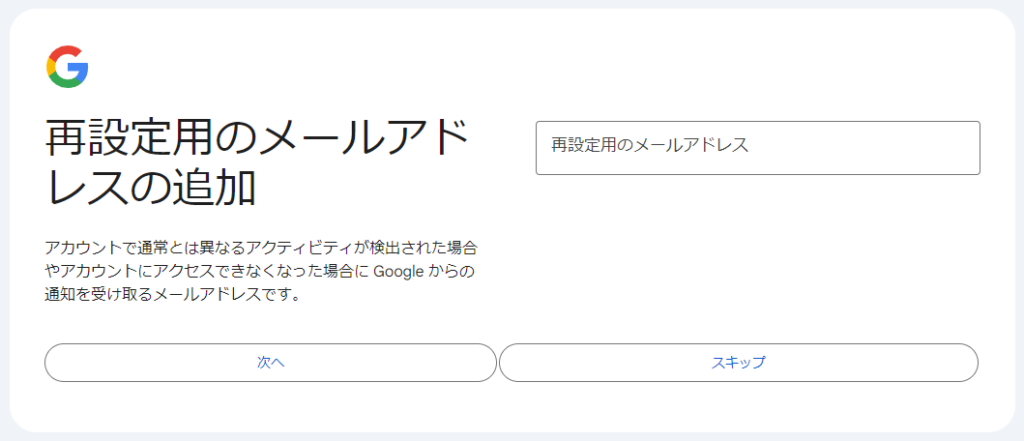
不正アクセスなどをされた際にGoogleから通知を受け取るメールアドレスを設定します。
これはスキップできますが、ここでは再設定用のメールアドレスを入力して「次へ」をクリックします。
※あとで再設定用のメールアドレスに設定通知のメールが届きました。
![Googleアカウントの再設定用のメールアドレスの設定通知のメール](https://koishiken.com/wp-content/uploads/2024/03/email-address-setting-notification-email-for-resetting-your-google-account.png)
「アカウント情報の確認」画面が表示されます。
![Googleアカウントのアカウント情報の確認画面](https://koishiken.com/wp-content/uploads/2024/03/google-account-account-information-confirmation-screen-1024x386.png)
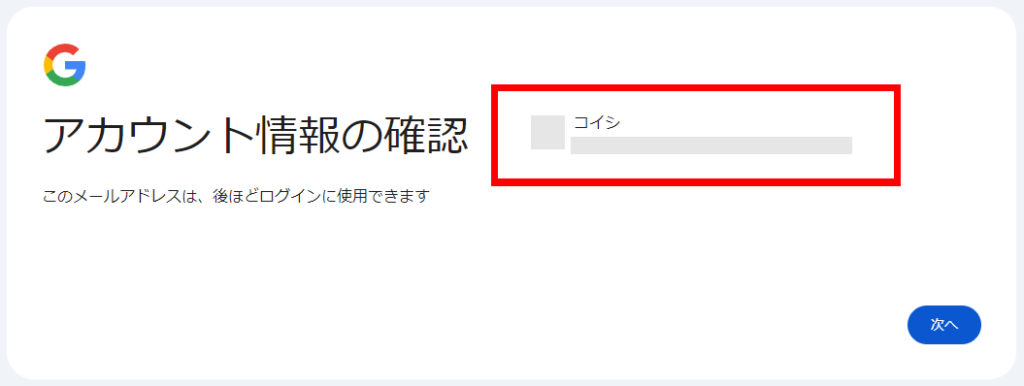
表示されているアイコン・名前・メールアドレスを確認して「次へ」をクリックします。
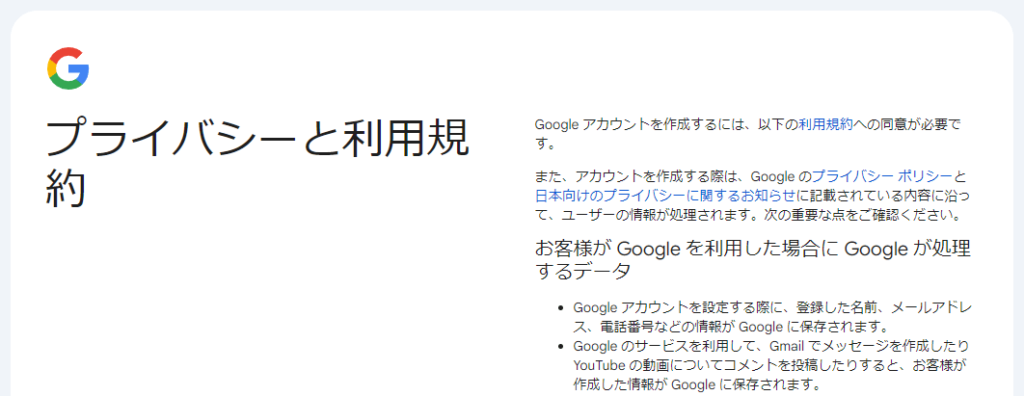
「プライバシーと利用規約」の画面が表示されるので内容を確認します。
![Googleアカウントのプライバシーと利用規約](https://koishiken.com/wp-content/uploads/2024/03/google-account-privacy-and-terms-of-service-1024x396.png)
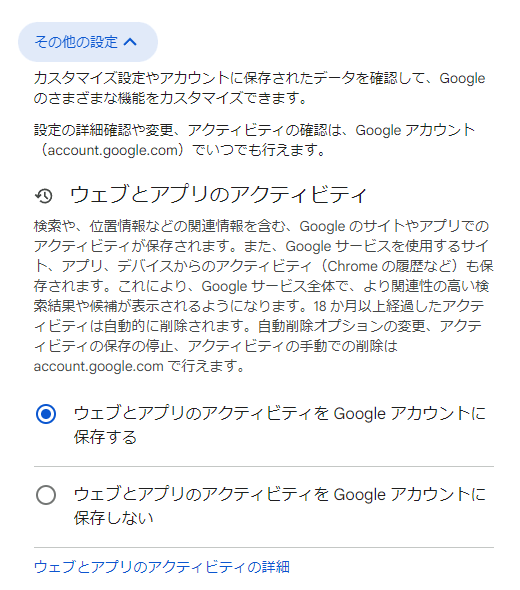
この中にある「その他の設定」を開くと下図のように色々と設定できますが、ここではこのままにしておきます。
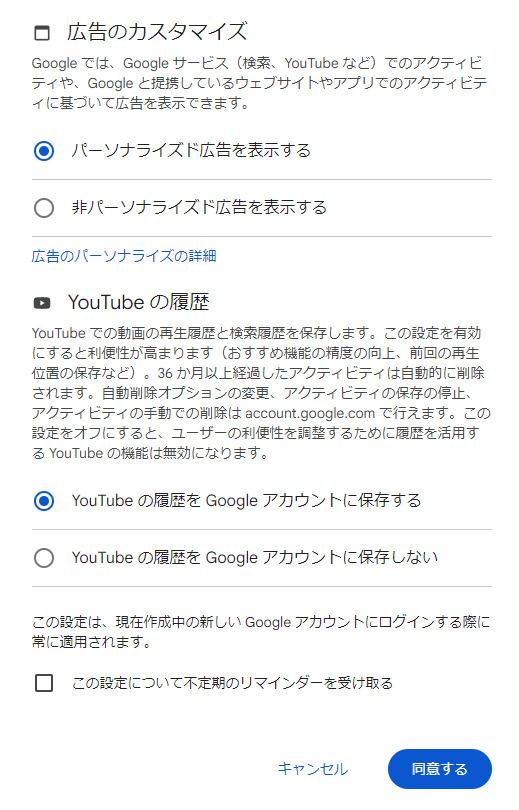
![Googleアカウントのプライバシーと利用規約のその他の設定画面](https://koishiken.com/wp-content/uploads/2024/03/other-settings-screens-for-google-account-privacy-and-terms-of-service.png)
![Googleアカウントのプライバシーと利用規約に同意するボタン](https://koishiken.com/wp-content/uploads/2024/03/button-to-agree-to-google-account-privacy-and-terms-of-service.png)
最後に「同意する」をクリックします。
画面右上に「新しいChromeプロファイルで続行しますか?」の画面が表示されます。
![新しいChromeプロファイルを作成するかの選択画面](https://koishiken.com/wp-content/uploads/2024/03/selection-screen-for-creating-a-new-chrome-profile.png)
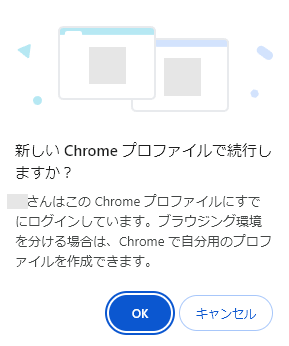
ここではブラウジング環境は分けないので「キャンセル」をクリックしました。
画面右上のアイコンを見ると、新しいアカウントでログインされています。
![新しく作成したGoogleアカウントでログインした](https://koishiken.com/wp-content/uploads/2024/03/logged-in-with-a-newly-created-google-account-1024x406.png)
![](https://koishiken.com/wp-content/uploads/2022/07/koishiken-150x150.jpg)
自動でアカウントの追加をしてくれるようです。
これで新しいアカウントが作成されました。
アカウントを切り替えるには、画面右上のアイコンをクリックします。
![Googleアカウントの切り替え画面](https://koishiken.com/wp-content/uploads/2024/03/google-account-switching-screen.png)
「その他のアカウントを表示」を開いて、切り替えたいアカウントのアイコンをクリックします。
アカウントが追加されない場合
作成したアカウントが追加されない場合、Googleのトップページにて上記と同じ手順で「その他のアカウントを表示」を開きます。
![GoogleトップページのGoogleアカウントのアイコン](https://koishiken.com/wp-content/uploads/2024/03/google-account-icon-on-google-home-page.png)
「別のアカウントを追加」をクリックします。
![Googleの別のアカウントを追加するボタン](https://koishiken.com/wp-content/uploads/2024/03/button-to-add-another-google-account.png)
「ログイン」画面が表示されます。
![Googleアカウントのログイン画面](https://koishiken.com/wp-content/uploads/2024/03/google-account-login-screen-1024x405.png)
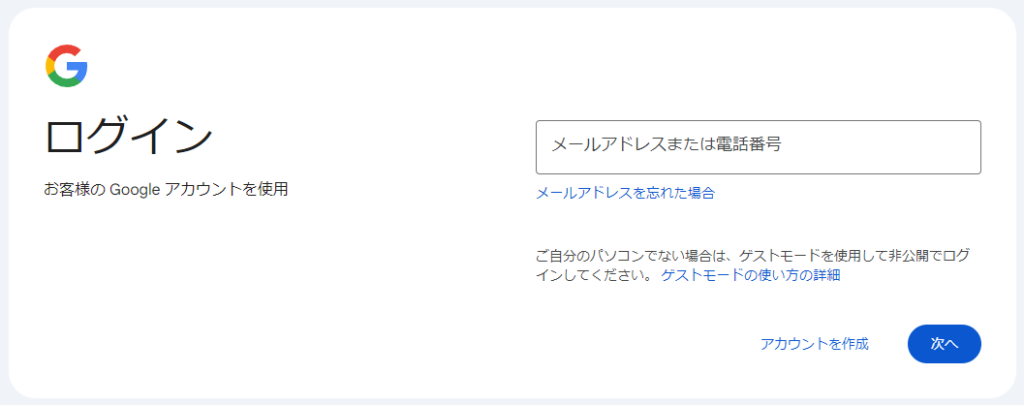
メールアドレス(または電話番号)とパスワードを入力してログインすればアカウントが追加されます。
電話番号入力画面が出ない場合
今回、アカウント作成の際に電話番号の入力は求められませんでした。
その場合の電話番号を登録する手順をお伝えします。
現在(記事投稿時点)、電話番号の登録は必須ではありませんが、不正アクセス対策の2段階認証を使うためにも登録した方がいいかと思います。
アカウント作成後、Googleのトップページにて画面右上のアイコンをクリックします。
![Googleアカウントを管理するボタン](https://koishiken.com/wp-content/uploads/2024/03/button-to-manage-your-google-account.png)
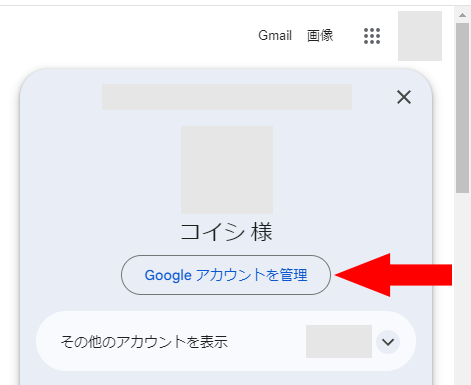
「Googleアカウントを管理」をクリックします。
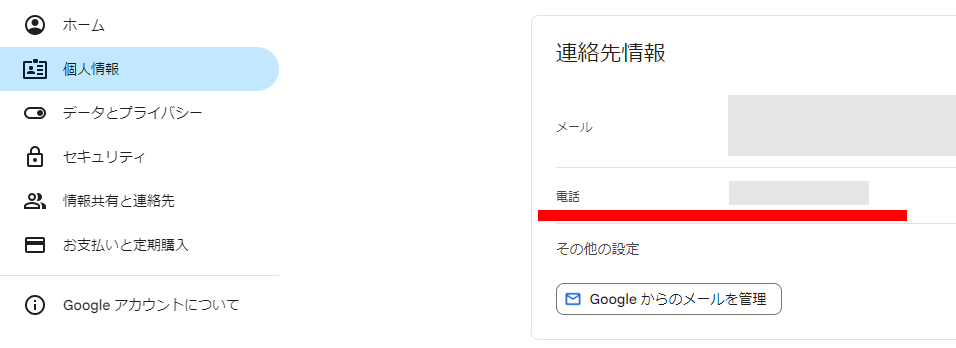
左メニューの「個人情報」をクリックします。
![Googleアカウント管理の個人情報の画面](https://koishiken.com/wp-content/uploads/2024/03/google-account-management-personal-information-screen-1024x253.png)
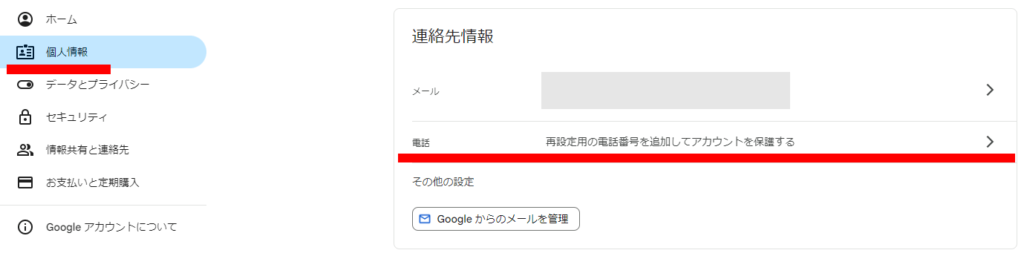
「連絡先情報」の「電話」の部分をクリックします。
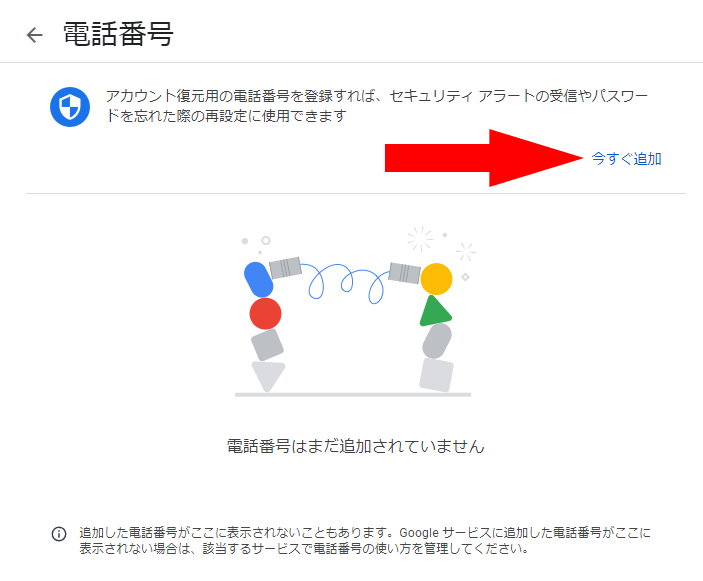
「電話番号」画面の「今すぐ追加」をクリックします。
![Googleアカウントの電話番号の追加ボタン](https://koishiken.com/wp-content/uploads/2024/03/add-button-for-google-account-phone-number.png)
「スマートフォンを追加」にて、スマホの電話番号を入力して「次へ」をクリックします。
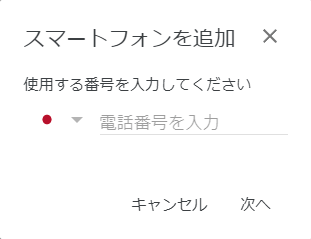
![Googleアカウントの電話番号の入力画面](https://koishiken.com/wp-content/uploads/2024/03/google-account-phone-number-input-screen.png)
「コードを入手」をクリックします。
![Googleアカウントの電話番号追加用のコード入手画面](https://koishiken.com/wp-content/uploads/2024/03/screen-to-obtain-code-for-adding-phone-number-to-google-account.png)
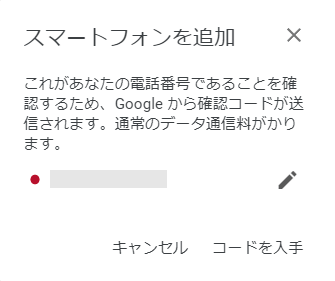
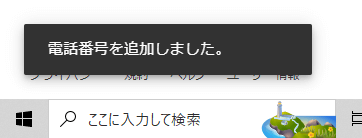
スマホに送信されたSMSに記載のコードを入力して「確認」をクリックします。
![Googleアカウントに電話番号を登録するためのコード入力画面](https://koishiken.com/wp-content/uploads/2024/03/code-entry-screen-for-registering-a-phone-number-to-your-google-account.png)
画面下に「電話番号を追加しました」と表示されました。
![Googleアカウントの電話番号追加のメッセージ](https://koishiken.com/wp-content/uploads/2024/03/message-to-add-phone-number-to-google-account.png)
「個人情報」画面に戻ると、電話番号が反映されています。
![Googleアカウントに登録された電話番号](https://koishiken.com/wp-content/uploads/2024/03/phone-number-registered-in-your-google-account.png)
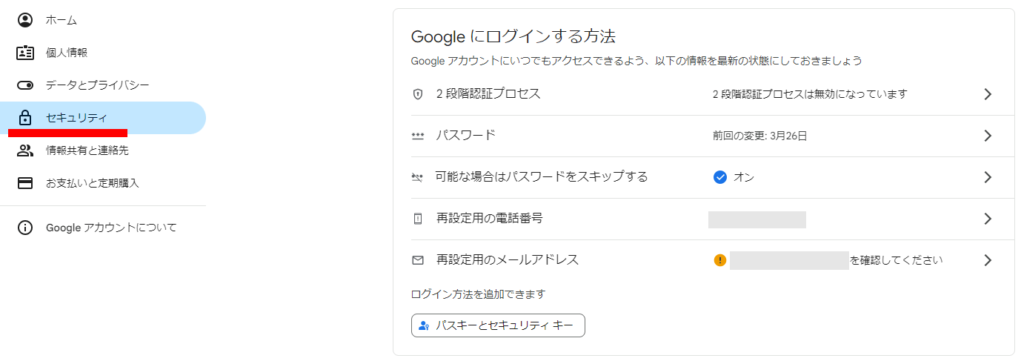
左メニューの「セキュリティ」をクリックすると、「Google にログインする方法」の「再設定用の電話番号」にも番号が反映されているのが分かります。
![GoogleアカウントのセキュリティのGoogleにログインする方法の画面](https://koishiken.com/wp-content/uploads/2024/03/google-account-security-screen-of-how-to-log-in-to-google-1024x364.png)
これで電話番号が登録されました。
2段階認証を設定する
電話番号を登録したら2段階認証を設定します。
まず上記と同じ手順で「セキュリティ」をクリックします。
![GoogleアカウントのセキュリティのGoogleにログインする方法の画面](https://koishiken.com/wp-content/uploads/2024/03/google-account-security-screen-of-how-to-log-in-to-google-1024x364.png)
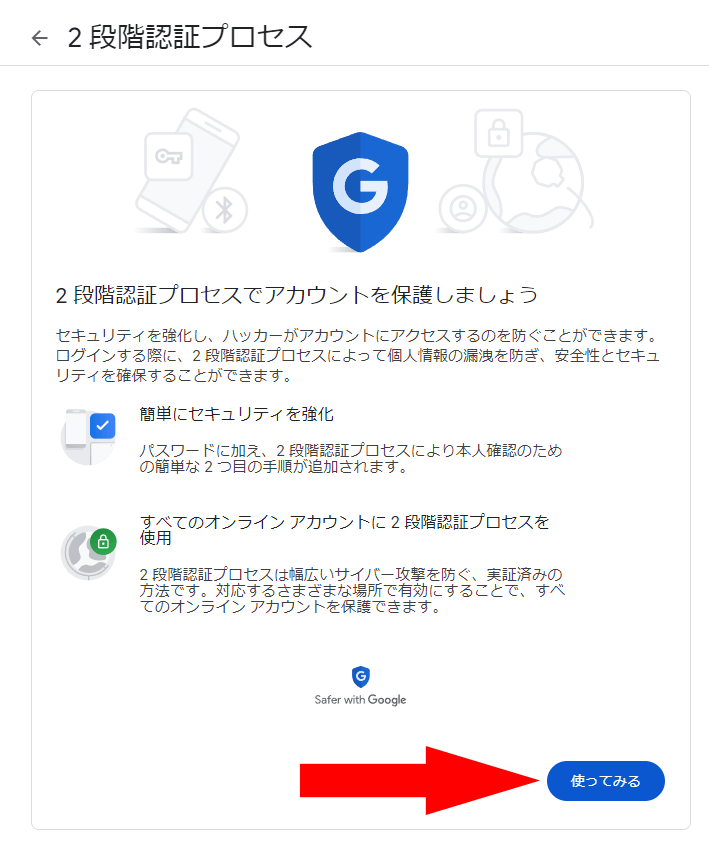
「Google にログインする方法」の「2段階認証プロセス」をクリックします。
「使ってみる」をクリックします。
![Googleアカウントの2段階認証の設定を開始する画面](https://koishiken.com/wp-content/uploads/2024/03/screen-to-start-setting-up-two-step-verification-for-your-google-account.png)
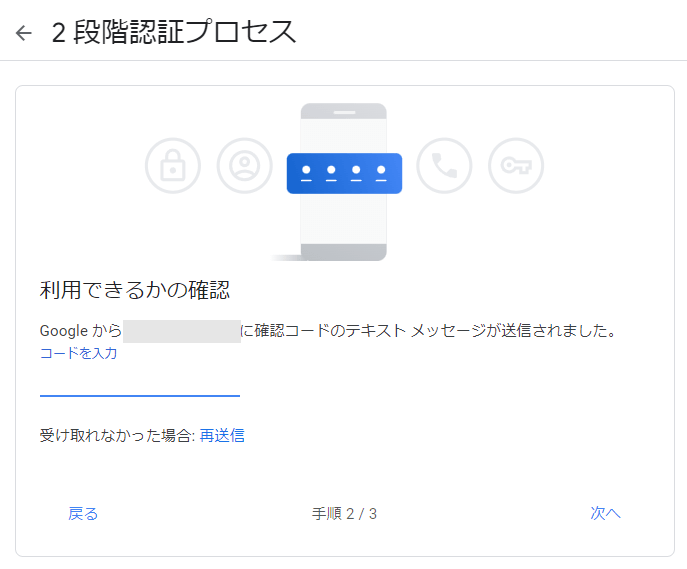
「使用する電話番号を選択してください」にさきほど設定した電話番号が表示されています。
![Googleアカウントの2段階認証の電話番号の選択画面](https://koishiken.com/wp-content/uploads/2024/03/google-account-two-step-verification-phone-number-selection-screen.png)
「コードの取得方法」はここでは「テキストメッセージ」を選択して「次へ」をクリックします。
スマホに送信されたSMSに記載のコードを入力して「次へ」をクリックします。
![Googleアカウントの2段階認証の確認コードの入力画面](https://koishiken.com/wp-content/uploads/2024/03/google-account-two-step-verification-code-entry-screen.png)
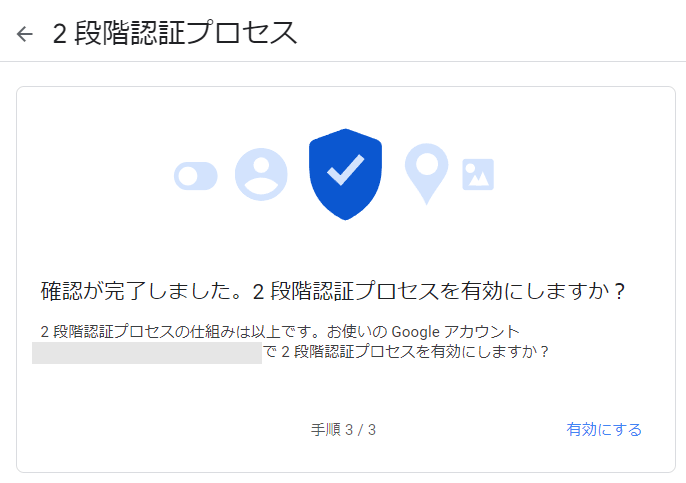
「確認が完了しました。2 段階認証プロセスを有効にしますか?」と表示されるので「有効にする」をクリックします。
![Googleアカウントの2段階認証を有効にする画面](https://koishiken.com/wp-content/uploads/2024/03/screen-to-enable-two-step-verification-for-google-account.png)
「セキュリティ」の画面に戻ると2段階認証が有効になっています。
![Googleアカウントの2段階認証の有効化完了画面](https://koishiken.com/wp-content/uploads/2024/03/google-account-two-step-verification-activation-completion-screen.png)
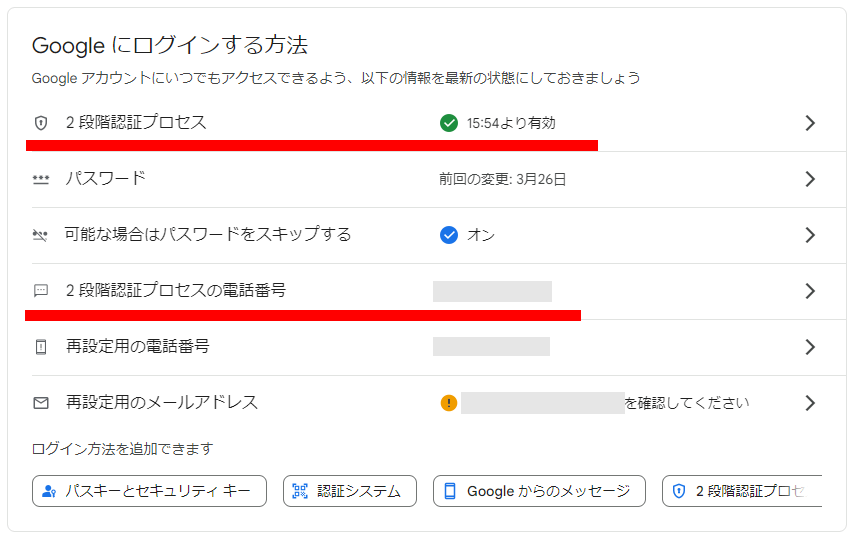
「2段階認証プロセスの電話番号」にも番号が反映されています。
![](https://koishiken.com/wp-content/uploads/2022/07/koishiken-150x150.jpg)
これで2段階認証が設定されました。
コメント