前回、AVerMediaのGC311ではAV仕様のファミコンの画面をキャプチャーできないことが分かりました。
そこで新たに購入したのが、I-O DATAのキャプチャーボード「GV-USB2」です。
今回はGV-USB2の接続の模様と使い方をお伝えします。
![](https://koishiken.com/wp-content/uploads/2022/07/koishiken-150x150.jpg)
小石健と申します。YouTubeチャンネルはこちら。
GV-USB2を購入
前回紹介したのは、AVerMediaの「Live Gamer MINI」(型番:GC311)というキャプチャーボードです。
どうも大抵のキャプチャーボードは、ファミコンの「疑似NTSC」という信号を取り込むことができないらしく、このGC311も例外ではなかったようです。
私の「ファミコンの画面を録画したい」という目的にかなわず、さっそくゴミと化してしまいました。
ということで次に購入したのが、I-O DATAの「GV-USB2」です。
これはレトロゲームの実況では定番品らしく、ファミコンの画面も映し出せるとのことです。
今回の内容はYouTubeに動画もアップしているので、よければこちらもご覧ください。
付属品と仕様
![GV-USB2の付属品](https://koishiken.com/wp-content/uploads/2024/02/gv-usb2-accessories.jpg)
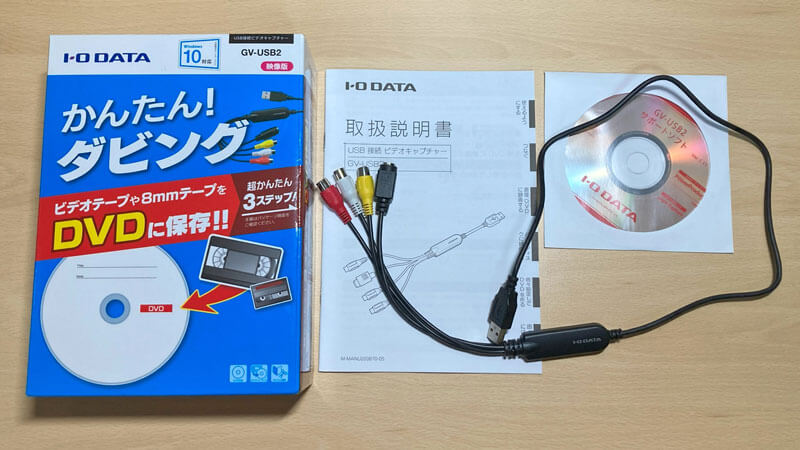
GV-USB2は、本体の他にCD-ROMと取扱説明書が付属しています。
以前は3000円台で購入できたそうですが、2022年10月に価格改定されたらしく、現在は値上げされています。
今回の使い方の流れは以下のとおりです。
- CD-ROMでソフトをインストール
- 本機とパソコンを接続
- パソコンを再起動
- 本機とファミコンを接続
- キャプチャーソフトを起動
- ファミコンの電源を入れ画面を映す
![](https://koishiken.com/wp-content/uploads/2022/07/koishiken-150x150.jpg)
以下その手順をお伝えします。
GV-USB2の使い方
ドライバのインストール
まず付属のCD-ROMをパソコンのドライブに挿入して読み込ませます。
エクスプローラーの「DVD RWドライブ(F:)」にCD-ROMのファイルが表示されました。
![GV-USB2の実行ファイル](https://koishiken.com/wp-content/uploads/2024/02/gv-usb2-executable-file.png)
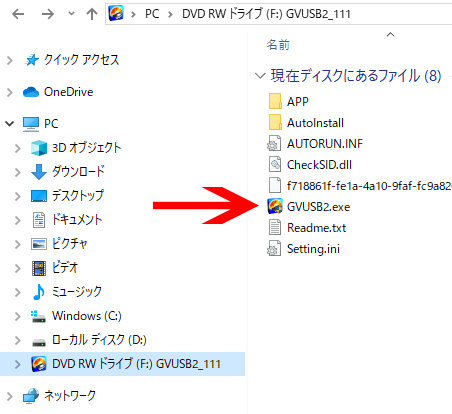
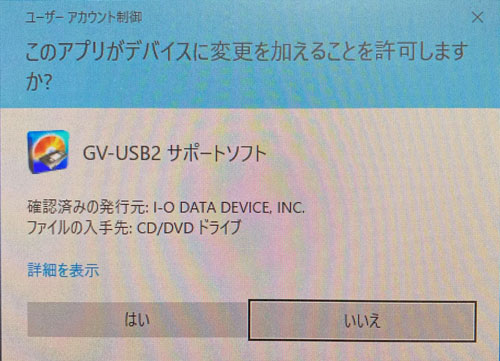
ここの「GVUSB2.exe」をダブルクリックして起動します。
「このアプリがデバイスに変更を加えることを許可しますか?」という画面が表示されたら「はい」をクリックします。
![GV-USB2のサポートソフトを許可する](https://koishiken.com/wp-content/uploads/2024/02/allow-gv-usb2-support-software.jpg)
インストーラーが起動しました。
![GV-USB2のインストール画面](https://koishiken.com/wp-content/uploads/2024/02/gv-usb2-installation-screen.png)
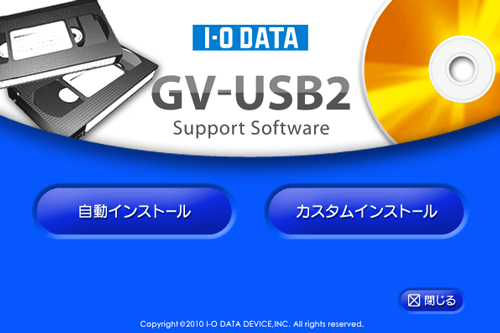
「自動インストール」では以下のソフトがインストールされます。
- ドライバ
- キャプチャーソフト「Light Capture」
- 動画編集ソフト「PowerProducer5」
私はPowerProducer5は必要ないので「カスタムインストール」をクリックしました。
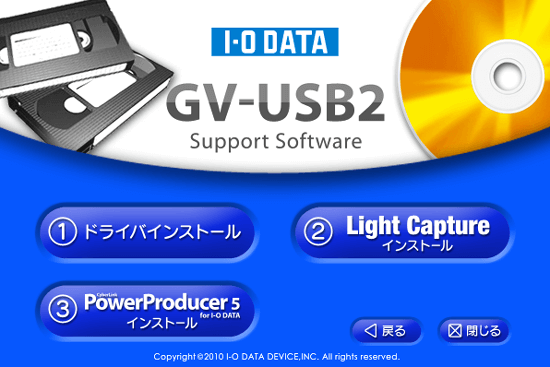
まず①の「ドライバインストール」(必ず最初にインストール)をクリックします。
![GV-USB2のインストールするソフトの選択画面](https://koishiken.com/wp-content/uploads/2024/02/gv-usb2-software-selection-screen-to-install.png)
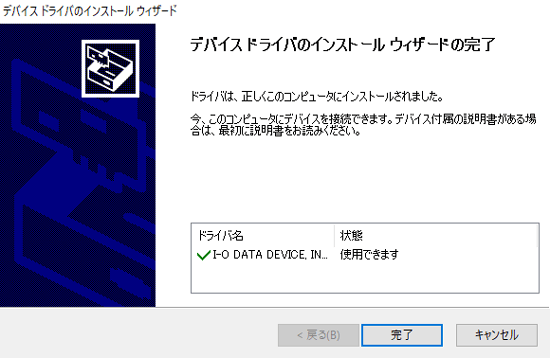
ドライバのインストールウィザードが表示されるので「次へ」をクリックします。
![GV-USB2のインストールウィザード開始画面](https://koishiken.com/wp-content/uploads/2024/02/gv-usb2-installation-wizard-start-screen.png)
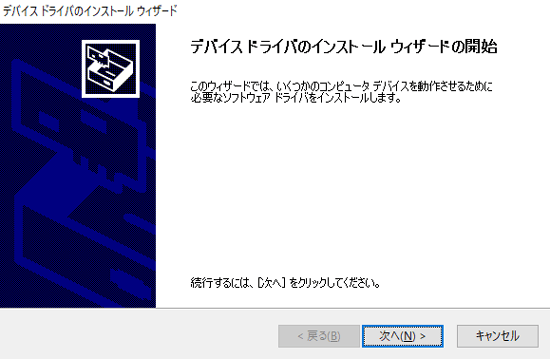
インストール完了の画面が表示されるので「完了」をクリックします。
![GV-USB2のインストールウィザード完了画面](https://koishiken.com/wp-content/uploads/2024/02/gv-usb2-installation-wizard-completion-screen.png)
Light Captureのインストール
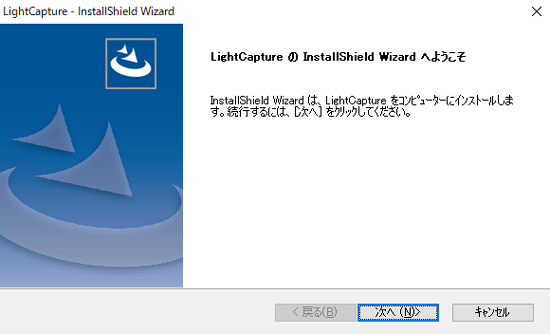
次に②の「Light Capture インストール」をクリックします。
![GV-USB2のインストールするソフトの選択画面](https://koishiken.com/wp-content/uploads/2024/02/gv-usb2-software-selection-screen-to-install.png)
Light Captureのインストールウィザードが表示されるので「次へ」をクリックします。
![Light Captureのインストールウィザード開始画面](https://koishiken.com/wp-content/uploads/2024/02/light-capture-installation-wizard-start-screen.png)
使用許諾契約を確認して「同意します」にチェックを入れ「次へ」をクリックします。
![Light Captureの使用許諾契約の画面](https://koishiken.com/wp-content/uploads/2024/02/light-capture-license-agreement-screen.png)
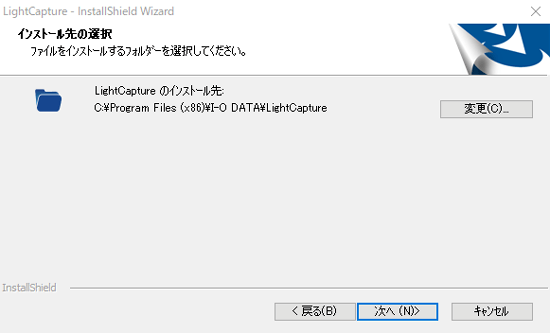
インストール先を選択して(今回はこのまま)「次へ」をクリックします。
![Light Captureのインストール先選択の画面](https://koishiken.com/wp-content/uploads/2024/02/light-capture-installation-destination-selection-screen.png)
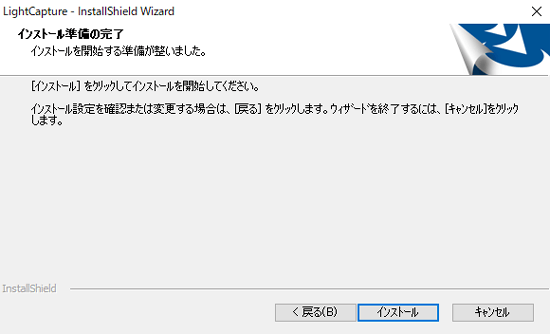
インストール準備の完了画面で「インストール」をクリックします。
![Light Captureのインストールの画面](https://koishiken.com/wp-content/uploads/2024/02/light-capture-installation-screen.png)
インストールが終わるとウィザードの完了画面が表示されます。
![Light Captureのインストールウィザード完了の画面](https://koishiken.com/wp-content/uploads/2024/02/light-capture-installation-wizard-completion-screen.png)
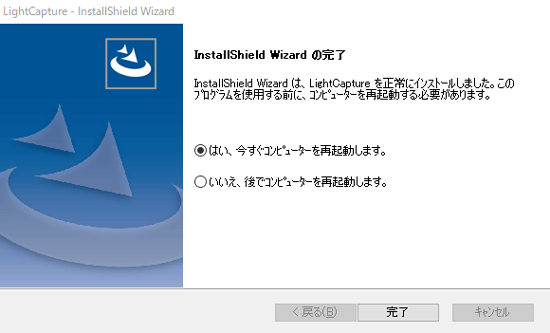
「はい、今すぐコンピューターを再起動します。」にチェックが入っていることを確認して「完了」をクリックします。
GV-USB2を接続する
デスクトップにはLight Captureのショートカットアイコンが作成されています。
![Light Captureのショートカットアイコン](https://koishiken.com/wp-content/uploads/2024/02/light-capture-shortcut-icon.jpg)
しかしLight Captureを起動しようとしても、下のメッセージが出てしまいます。
![GV-USB2が見つからないメッセージ](https://koishiken.com/wp-content/uploads/2024/02/gv-usb2-not-found-message.png)
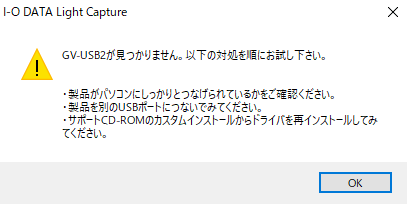
GV-USB2をパソコンに接続しないと起動しないようです。
まずはGV-USB2のみをUSBケーブルでパソコンに接続して、Light Captureを起動しました。
![Light Captureの操作画面](https://koishiken.com/wp-content/uploads/2024/02/light-capture-operation-screen.png)
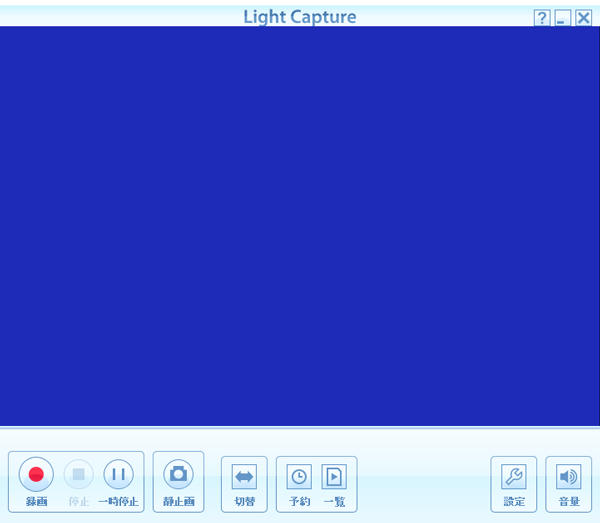
するとLight Captureの操作画面が表示されました。
![](https://koishiken.com/wp-content/uploads/2022/07/koishiken-150x150.jpg)
当然画面には何も映っていません。
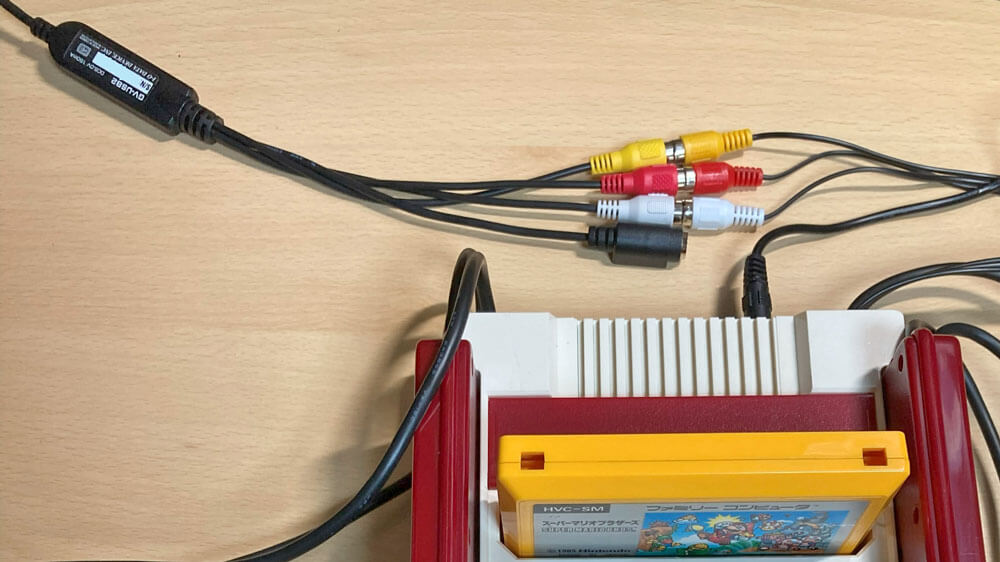
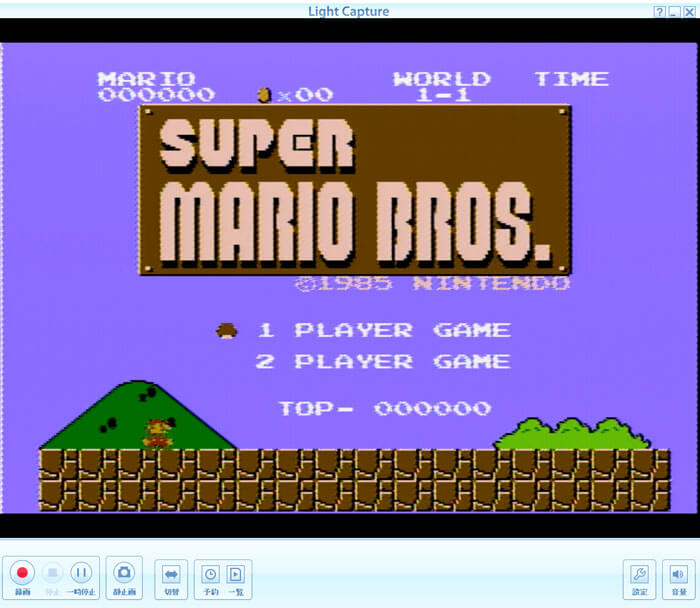
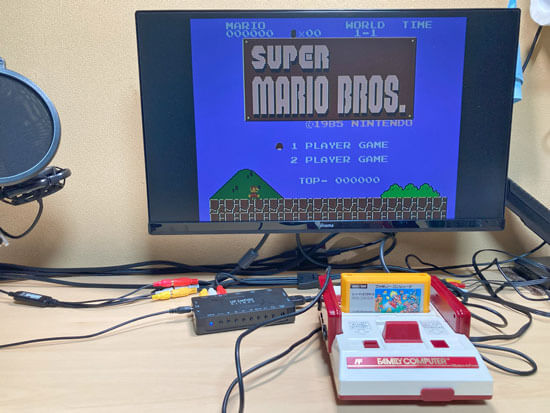
次にファミコンのケーブルをGV-USB2に接続。
![GV-USB2とファミコンを接続](https://koishiken.com/wp-content/uploads/2024/02/connect-gv-usb2-and-famicom.jpg)
カセットを挿してファミコンの電源をオン。
無事ファミコンの画面が映りました。
![Light Captureで映したスーパーマリオブラザーズ](https://koishiken.com/wp-content/uploads/2024/02/super-mario-bros-captured-with-light-capture.jpg)
Light Captureはゲーム実況には不向き
Light Captureは映像を映すだけでなく、もちろん音も聞こえます。
しかし入力遅延は明確に感じます。
![](https://koishiken.com/wp-content/uploads/2022/07/koishiken-150x150.jpg)
というか、酷い。
快適とはほど遠いので、キャプチャー画面を見ながらのプレイはあきらめた方がいいでしょう。
またLight Captureは設定の自由度が乏しいため、ゲーム実況にも向かないと思います。
というか、私はなぜかファミコンの画面を録画することができませんでした。
![ゲーム画面が録画できないLight Capture](https://koishiken.com/wp-content/uploads/2024/02/light-capture-cannot-record-game-screen.jpg)
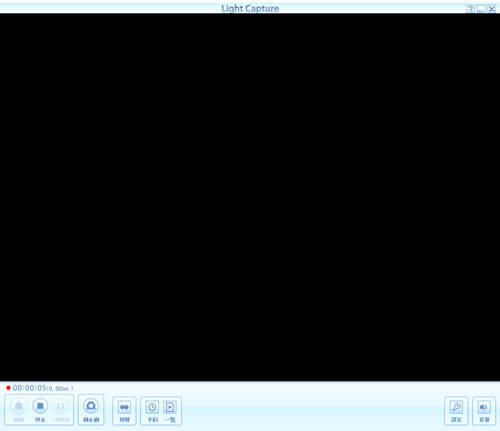
録画ボタンをクリックすると画面が暗転したままになってしまいます。
![](https://koishiken.com/wp-content/uploads/2022/07/koishiken-150x150.jpg)
Light Captureも要らん…
ちなみにOBS studioでもファミコンの画面をキャプチャーすることができました。
![OBS Studioにキャプチャーしたスーパーマリオブラザーズ](https://koishiken.com/wp-content/uploads/2024/02/super-mario-bros-captured-in-obs-studio.jpg)
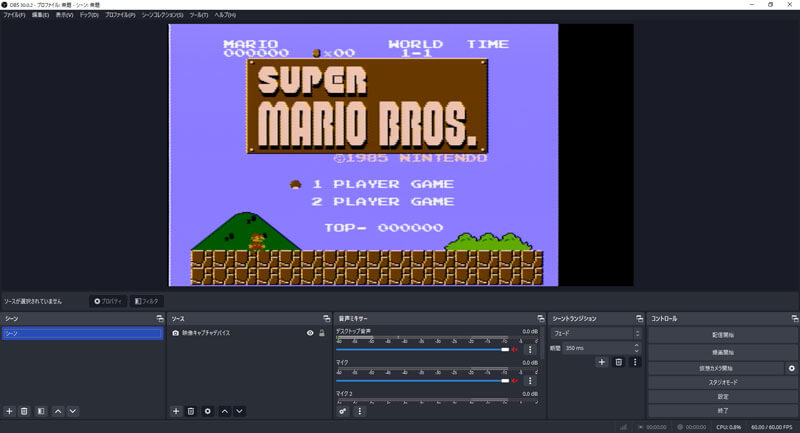
こちらでは録画することができたので、私はOBS studioを使うことにします。
OBS studioのダウンロードおよびインストールの方法は下の記事をご参照ください。
キャプチャーとプレイを分ける
ついでに私はこの2分配のAVケーブルも購入しました。
![](https://koishiken.com/wp-content/uploads/2022/07/koishiken-150x150.jpg)
これでキャプチャーとプレイの画面を分けます。
まずファミコンのケーブルをこのメス端子に接続。
![2分配のAVケーブルとファミコンを接続](https://koishiken.com/wp-content/uploads/2024/02/connect-2-distribution-av-cable-and-famicom.jpg)
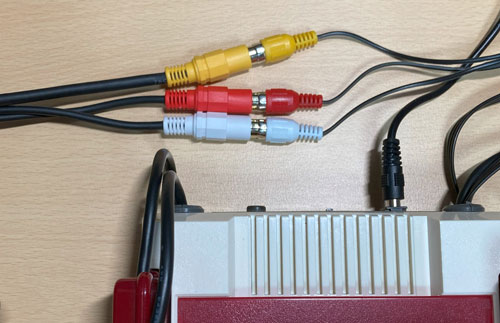
そしてオス端子の一方はGV-USB2に、もう一方はアップスキャンコンバーターに接続。
![2分配のAVケーブルにGV-USB2とアップスキャンコンバーターを接続](https://koishiken.com/wp-content/uploads/2024/02/connect-gv-usb2-and-upscan-converter-to-2-distribution-av-cable.jpg)
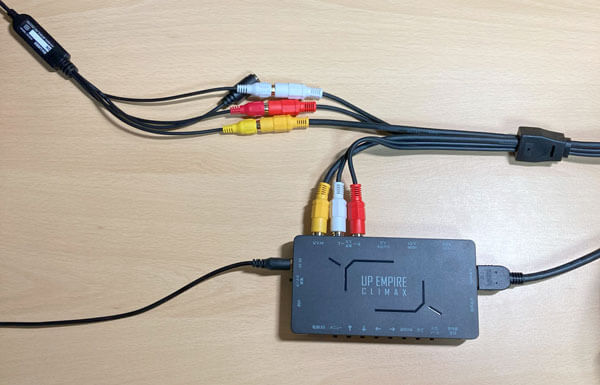
このアップスキャンコンバーターから出力したHDMIケーブルをモニターに接続しました。
これによりファミコンのキャプチャー画面とプレイ画面を切り替えることができます。
![GV-USB2とアップスキャンコンバーターにファミコンを接続](https://koishiken.com/wp-content/uploads/2024/02/connect-famicom-to-gv-usb2-and-upscan-converter.jpg)
以上でようやっとキャプチャーとプレイの環境を整えることができました。
OBS studioは自由度が高いゆえに設定を覚えるのに苦労しそうですが、他のキャプチャーボードでも使えるので便利かと思います。
いずれにせよ最初からOBS studioを使った方がいいかもしれません。
![](https://koishiken.com/wp-content/uploads/2022/07/koishiken-150x150.jpg)
これから地道に慣れていきます。
コメント